How To Draw a Cat


First start off by making an oval shaped head. Next connect a long neck to it connectiong into a long body. Make the legs go into paws and draw sharp claws. Then going back to the face draw squinting big eyes and snake looking pupils. Draw a small nose and add some shine to it if you’d like. Make the mouth connecting to it in the shape of a W. Once you’re done with the face you can draw the ears. Make the ears pointy and a little bit curved around the edges of them. Draw a curved tail on the end of the body. Later when you’re finished you can draw the additional details to the cat. If you want to make it a girl cat and a little bit cartoony you can also draw a ribbon on it’s head or long eyelashes to the eyes. Or if it’s a boy you can draw a collar although most cats don’t have collars. It’s your choice how you want to make it look like. These are some simple steps on how to draw a cat. You can either make it look realistic or like a cartoon. For more details on how to draw a cat watch this video which I do not own:

Posted in Arts & Crafts, Cats | Tagged , , , | 1 Comment

How To Draw Cartoon Dog or Puppy


First make a U. Then make two ears on each side of it that curve into it. Next curve the top of the head. Make two normal sized eyes and decide where you want your dog to look. Give it a big shiny black nose. You can also leave a little bit of white to show a little bit of shine. Then make a tongue to show he’s happy. And the body is the same as the cat basically. Make one leg with a paw coming down. Do the same with the other leg and the other paw. Make the body and the back paws afterwards. Put the small claw details into the claws. And at last finish it with a tail. If you want to make it a puppy you can make it smaller or if you want it to be a dog you can leave it big. You can draw extra details if you want but since this is a cartoon dog it doesn’t really need very many details. You can choose the color of it and how you want the extra details to look like. If it’s a female cartoon dog you could also add a ribbon on it’s head to make it look cute.

You can also watch this video to watch how it’s made which I do not own:

http://www.youtube.com/user/expertvillage#p/search/18/59GP7CAL8fE

Posted in Arts & Crafts, Pets | Tagged , , , | 1 Comment

How To Draw a Dragon


Start by sketching an S shape onto the paper. Then take your line down and let the other side swoosh out for the spikes in the back, almost like a horse in the beginning. Then draw the wings for the dragon, they look similar to bat wings. Next take your brush and make a tail curved out of it. You can continue the stroke of the spikes on the back of it to give a good look. When you’re done with that, make the legs and feet. You can make your dragon in your own unique way and color it any color you’d like. Drawing dragons is quite simple and fun to do. You can draw flame near the dragon’s mouth to make it look even cooler than before. Hopefully this gives you a little explanation on how to draw a dragon. Many people draw them in different ways and if you still don’t think your dragon looks right here is a video showing how you can draw it which I do not own:

Posted in Arts & Crafts, Beauty | Tagged , , , | Leave a comment

How To Draw A Skull


First draw a half circle with the opening at the bottom. This will represent the top of the skull. Add cheekbones by drawing two lines starting just inside the open part of the half circle and gently curving outside the circle. Continue the cheekbone line so they move downward and curve inward toward the center of the skull. Then connect the two lines horizontally. This will be the bottom row of teeth. Next draw a broad U shape connecting the bottom of the cheek bones and going across the bottom jaw line. This will be the top row of teeth. The skull has three basic sections. Draw a second U shaped line parallel and below the first and draw short straight lines on both sides. Create teeth with short vertical lines inside the smile. Slightly darken teeth faces. Add wide round eye cavities centered between the top of the head and chin. Add two teardrop shapes between the cheek bones and above the teeth for the nose cavity. Next shade everything you just drew.

If you couldn’t draw this or it was too complicated for you and turned out terrible then you can also watch this video which I do not own:

http://www.youtube.com/watch?v=HfJy6AKgDZY

Posted in Arts & Crafts, Costumes for Halloween | Tagged , , , | Leave a comment

How To Draw A Rose


When drawing this you will do a rosebud.  First draw an 0val where your bud is going to be. Then draw a crooked line for your stem. The bottom of the rose is essentially a starburst. Next draw a couple of thin leaves. Now for the rosebud follow your general oval shape. It looks like a teardrop shaped that is a little curved and a little angled. After that get another one in underneath it. From there, you can make a curved one and another curved one until you have an entire rosebud. Then you can shade around it or color it, depending on how you want it to look like in your own unique way. Then make your stem into just a basic shape with little crooks to it because natural roses in the wild and nature always have that crookedness to it. Add some thorns, which are always angled upward and are always curved. If you go into shading them, they’re always darker on the tips as well. Add some leaves. Roses usually have notches on their leaves. Then shade them as you see fit. You can curve them and get some vein lines in there too. You should have a natural looking rose now.

If you don’t understand how this is done you can also watch this video which shows you a different way on how to draw a rose and I also don’t own:


Posted in Arts & Crafts, Beauty | Tagged , , , | Leave a comment

Tap Zoo App Review

Tap Zoo is a good app for the iPhone/iPod Touch. You can go to the app store and get it for free. In this game what you do is you try to make a zoo full of many animals and the more you play the better and higher you’ll go. You start out on level 1 with 300 coins. You can get up to very high levels and many coins to buy more animals and land. The better your zoo gets the more people will come to it and the more interesting the game gets. This is very addicting and you can take it with you anywhere.

Here are some cool zoos that people have made with it:

Here is a full review video on this app which I do not own:

http://www.youtube.com/watch?v=sWe8vD0qiE0

Posted in Electronics and Computers, Virtual Worlds | Tagged , , , | Leave a comment

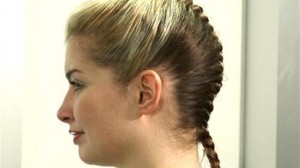
How To French Braid Hair

Some people can only braid hair but want to learn to french braid. Here are the steps to french braiding hair:

Step 1. Brush your hair out to get tangles and knots out before doing this.

Step 2. Start at the hairline and gather enough hair from the top of your head to start a regular braid.

Step 3. Divide your hair into three equal sections.

Step 4. When you make the braid pull the sections fairly tight so it won’t come undone.

Step 5.  Before repeating the cross over motion with the right section gather a little bit of additional hair.

Step 6. After you’ve added it to the other section cross the larger portion over the middle section.

Step 7. Gather a small section of the remaining hair on the left side of your head up and into the left section and repeat the steps over again.

Step 8. When you’re done with it wrap a band around the end to keep it in place and you’re done.

If this is too complicated you can also watch this video that shows how which I also do not own:

Posted in Arts & Crafts, Beauty | Tagged , , , | Leave a comment

Hair Color Booth App Review

Hair Color Booth is an app for the iPhone/iPod Touch. It’s where you take a picture of someone and then you get to edit it and change their hair color. This is a pretty fun application for when you’re bored and have nothing to do. You can buy it at the app store for only 99 cents.

So first what you do once you’re in the application is you press camera. Then you take a picture of yourself. If you want the picture then press use. It will give you all kinds of brush options. Highlight all of your hair and once you’ve done that go to colors. You can pick what color you want your hair or if you don’t want it all dyed then you can edit yourself highlights. You can share this and put it on Facebook. I think this is a creative app and great to mess around with. But if you have dark hair and try to make it lighter it doesn’t work very well. I’d give it about 7 out of 10 stars probably.

Here are pictures of two hair colors people chose:

Posted in Arts & Crafts, Beauty | Tagged , , , | Leave a comment

How To Grow Your Hair Out Faster

Some people have really short hair and want to grow their hair out. Here is some advice for growing your hair out after you’ve cut it real short or have never had it long before. Personally I haven’t got my hair cut very short very much in my life so I’ve almost always had long hair. Many people ask me how they can grow their hair out to be all the way down to their waist. First off make sure to brush and comb your hair very well and get the tangles out everyday to make this easier to grow it out. When brushing or combing your hair everyday it’s optional to use conditioner but it really helps when you want to grow your hair out long or thick. Make sure you wash your hair at least once a week or more and use a healthy shampoo. If you eat a healthy diet too it can possibly help a little bit.

When your hair is at least to your shoulders keep doing the same thing until it grows longer. It can take up to months or even a year to grow it all the way down to where you want it. It depends on how fast your hair grows. Sometimes getting it trimmed every few months helps it grow faster and makes it easier to avoid getting split ends. If you’ve been trying this and your hair still isn’t growing out fast you can always get extensions if this bothers you too badly. You can start wearing extensions about the same color as your hair until it finally gets to the length you want it. Hopefully these tips and advice have helped you and for more information watch this video which I do not own:

Posted in Arts & Crafts, Beauty | Tagged , , , | Leave a comment

How To Sharpen An Eyeliner Pencil

Sharpening an eyeliner pencil is basically the same as sharpening any regular pencil you would use at school or work. It has a few more steps to it though. If you have a very dull eyeliner pencil and it’s hard to put it on in the mornings then this will really help you. If you want you can also get a special type of sharpener for your eyeliner pencil but if not then follow these steps:

Step 1. Take the lid off your eyeliner pencil and keep it off for a minute.

Step 2. Put it back on and put your eyeliner pencil in the freezer.

Step 3. Leave it in there for at least 4-5 minutes.

Step 4. Take it out and take the lid off.

Step 5. Get a regular handy pencil sharpener and sharpen it.

Your eyeliner pencil should now be sharp and ready to use. I hope this helped for the people who are having trouble, please watch this video if the steps didn’t help, I do not own this video:

http://www.youtube.com/watch?v=0MHD4NlChDA


Posted in Arts & Crafts, Beauty | Tagged , , , | Leave a comment